
A blog should have a contact us page. It helps users to contact webmaster and admin. There are a few ways to add a contact us page in Blogger.
This post will help you Create a contact us page for Blogger(Blogspot). It is simple to add contact us page HTML into a page. Unlike WordPress, Blogger doesn’t support plug-ins so adding a contact us form is a difficult task. What most of the Blogspot bloggers does is to seek the help of third-party sites (foxyform, jotform, 123contactform, etc.).
Let see how you can add the contact us gadget and third-party contact form in blogger as all you need to do is insert a third party code and get your contact form.
The second method shows you a free service you can use to embed a custom form into your site and receive emails at any email address you want.
So, let’s get started and add a Contact Page to your Blogger site.
Setup bloggers contact form widget:
Step 1: Visit blogger.com and log in to your account. If you are running multiple blogs, you need to choose the desired blog from the list.
Step 2: Click on Layout from the left sidebar to get an option to add gadgets. Click on “new gadget”. See the infographic below for more information.

Step 3: Clicking on it will bring you to a list of gadgets. Scroll down and you see

Contact Form
Add a contact form to your blog.
Click on the + sign to add the contact form gadget from the list of gadgets.
If you click on + sign, the contact form window will pop out, here, you can change the title (the default title is "contact form" you may change it "Contact Us" or any other of your convenience and click on "save" after you finished editing the title.
Step 4: Save the arrangement, after you have added the contact form, you can see the contact form in the layout section after you have added it.
Now that you have added the contact form gadget, I would like you to see how it is live on your blog before we move to the second section of the tutorial how to add a contact us page in blogger. So now go to the upper right section of your blogger dashboard and click on "view blog".
It will take you to a new tap of your browser, there you will see how the contact form appears on your blog.
The way the contact form appears on the blog is not nice, so what we will do is to hide it. This brings us to the second section of the tutorial, how to add contact page on blogger blog.
This method is to customize the template through the advance tap and add some CSS codes to customize your template.
Step 1: Go to Theme >> Customise
See the infographic below for more information.

Step 2: Clicking on "customise" will take you to the "Blogger Theme Designer" page. Now go to
Advanced>> Add CSS.
Step 3: Add the CSS code below to the space that appears after you click "Add CSS" after that click on "Apply to Blog" to customize it. After that go back to blogger and view your blog.
See the infographic below for more information.

Now you will realize that when you go back to blogger, the contact form has vanished from your blog. Don't worry, just follow the tutorials!
Step 1: Go to Pages and click on New page.

Step 2: Paste the following code into the HTML post editor after removing everything in it.

Step 3: Add a title (like Contact Us) and then change the settings given right as given below.
Step 4: Finally, click the Publish button. That’s all.

The messages sent from this contact form will be delivered to the admin email. If the blog has more than one admin, all of them will get it.
Forms created from jotforms are generally used for data collection .
The data posted on forms is sent via email to the owner.
Here we will use jotform as blogger contact form generator.
Jotforms FREE starter pack provides with :

Step 2: Click on the “Create Form” green button located at the middle of the page.

Step 3: Select the middle option “Use Template”.

Step 4: On left side of page, under types click on “Contact Forms”.

Step 5: Select “General Enquiry Contact Form” by clicking on “Use Template” below it.

NOTE: Use any other “Contact form” templates which best fits your needs and liking, we will be using “General Enquiry Contact Form” for simplicity purpose.
Step 6: Click on the “Add Form Element”.

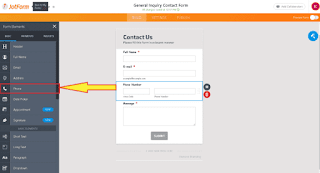
In this section, you can more fields, extra texts. For example, I have added a phone number field for our extra requirements.
Step 7: Use “From Designer” tab on the right side of the page to change the appearance!

Use colour scheme to change the overall colour of the contact page.

Step 8: Jotforms also provides with an option to brand your website on the Contact form.
To add logo of your website to Contact Us page, click on “ADD YOUR LOGO” which is located above contact us page.

Click on the upload file field or drag-drop HD image of your logo.

Adjust the alignment and it’s done!

Step 9: Click on setting tab.
Here you can set logical conditions of the form(effects like show hide fields),
Notifications to be sent via email to you,
Integrate your contact form with MailChimp services and
one can set auto-mail-responder response message who has contacted you using Contact form.

Step 10: Click on the “Publish” tab.
Under the “Publish” tab click on “PLATFORMS” located on left side.

Select blogger platform from list.
On the next page, the code to embed will be displayed.
Click on the green colour “Copy code” button (code will be copied to your clipboard).
 embed Codes")
Step 11: Now, its time to add our Contact form to blogger.


To publish your Contact Form click on the orange button “Publish”.
Now you can make your blog more professional looking by adding “contact us” page.
You can now apply to various affiliate programs and ads network like Adsense with better confidence and start earning.
This post will help you Create a contact us page for Blogger(Blogspot). It is simple to add contact us page HTML into a page. Unlike WordPress, Blogger doesn’t support plug-ins so adding a contact us form is a difficult task. What most of the Blogspot bloggers does is to seek the help of third-party sites (foxyform, jotform, 123contactform, etc.).
Let see how you can add the contact us gadget and third-party contact form in blogger as all you need to do is insert a third party code and get your contact form.
How to Create a Contact Page on Blogger.
So, I’m going to teach you 2 ways to add a Contact Page to Blogger. The first method Using Blogger contact widget. This method is great because it’s easy to set up and you don’t have to sign up for any outside services or apps. The main limit is that you can’t add any extra fields or use an email other than the email associated with your Blogger account.The second method shows you a free service you can use to embed a custom form into your site and receive emails at any email address you want.
So, let’s get started and add a Contact Page to your Blogger site.
Method 1: Using blogger contact form widget :
Most of the new bloggers using blogspot find it difficult to make a “Contact Us” page for their blog. The “contact us” forms provided by third-party sites works but is not as reliable as using official contact us gadget.Advantages of using contact Gadget :
- when a response is submitted, whole pages does not need to be reloaded.
- The delivery of the messages to you is very reliable, quick and responsive as it an official contact gadget.
- contact gadget uses a really simple yet effective interface for visitors to use.
- contact gadget can be customised according to your need if you know Cascade Style Sheet (CSS).
Setup bloggers contact form widget:
Section 1: Adding the Contact Gadget
Follow the steps given below to add a contact us gadget on your blog.Step 1: Visit blogger.com and log in to your account. If you are running multiple blogs, you need to choose the desired blog from the list.
Step 2: Click on Layout from the left sidebar to get an option to add gadgets. Click on “new gadget”. See the infographic below for more information.

Step 3: Clicking on it will bring you to a list of gadgets. Scroll down and you see

Contact Form
Add a contact form to your blog.
Click on the + sign to add the contact form gadget from the list of gadgets.
If you click on + sign, the contact form window will pop out, here, you can change the title (the default title is "contact form" you may change it "Contact Us" or any other of your convenience and click on "save" after you finished editing the title.
Step 4: Save the arrangement, after you have added the contact form, you can see the contact form in the layout section after you have added it.
Now that you have added the contact form gadget, I would like you to see how it is live on your blog before we move to the second section of the tutorial how to add a contact us page in blogger. So now go to the upper right section of your blogger dashboard and click on "view blog".
It will take you to a new tap of your browser, there you will see how the contact form appears on your blog.
The way the contact form appears on the blog is not nice, so what we will do is to hide it. This brings us to the second section of the tutorial, how to add contact page on blogger blog.
Section 2: Hiding the Contact Form Gadget
Now, you are going to learn how to hide the contact form gadget.This method is to customize the template through the advance tap and add some CSS codes to customize your template.
Step 1: Go to Theme >> Customise
See the infographic below for more information.

Step 2: Clicking on "customise" will take you to the "Blogger Theme Designer" page. Now go to
Advanced>> Add CSS.
Step 3: Add the CSS code below to the space that appears after you click "Add CSS" after that click on "Apply to Blog" to customize it. After that go back to blogger and view your blog.
div#ContactForm1 {
display: none !important;
}
See the infographic below for more information.

Now you will realize that when you go back to blogger, the contact form has vanished from your blog. Don't worry, just follow the tutorials!
Section 3: Adding Contact Form to a Page
You will get the customized official blogger contact form code here to be added to be shown on a separate page.Step 1: Go to Pages and click on New page.

Step 2: Paste the following code into the HTML post editor after removing everything in it.

Get in touch with Us by filling the Form:<!-- Contact Form Code -->
<style>
.page-contact-form input,
.page-contact-form textarea {
width: 100%;
max-width: 100%;
margin-bottom: 10px;
}
.page-contact-form input.contact-form-button.contact-form-button-submit {
padding: 10px;
background: #000; /* Button background color */
color: #fff; /* Button text color */
border: none;
}
.page-contact-form input.contact-form-button.contact-form-button-submit:hover {
background: #777; /* Button background hover color */
color: #fff; /* Button text hover color */
}
</style>
<div class="contact-form-widget page-contact-form">
<div class="form">
<form name="contact-form">
Name:
<input class="contact-form-name" id="ContactForm1_contact-form-name" name="name" size="30" type="text" value="" />
E-mail: <span id="required">*</span>
<input class="contact-form-email" id="ContactForm1_contact-form-email" name="email" size="30" type="text" value="" />
Message: <span id="required">*</span>
<textarea class="contact-form-email-message" cols="25" id="ContactForm1_contact-form-email-message" name="email-message" rows="5"></textarea>
<input class="contact-form-button contact-form-button-submit" id="ContactForm1_contact-form-submit" type="button" value="Submit" />
<div class="contact-form-error-message" id="ContactForm1_contact-form-error-message">
</div>
<div class="contact-form-success-message" id="ContactForm1_contact-form-success-message">
</div>
</form>
</div>
</div>
<!-- End Contact Form Code -->
Step 3: Add a title (like Contact Us) and then change the settings given right as given below.
Step 4: Finally, click the Publish button. That’s all.

The messages sent from this contact form will be delivered to the admin email. If the blog has more than one admin, all of them will get it.
Method 2 : Using Jotform contact form:
JotForm is used to create online form pages and publish them.Forms created from jotforms are generally used for data collection .
The data posted on forms is sent via email to the owner.
Here we will use jotform as blogger contact form generator.
Jotforms FREE starter pack provides with :
- 100 monthly form submissions
- Unlimited reports, fields perform
- 5 forms
- 1,000 monthly form views
- 100 MB available space
- 500 stored forms
- No HIPAA compliance
- JotForm branding on form
Now let’s create a contact form using FREE starter pack from JotForm :
Step 1: Make a free account on jotform by signing up.
Step 2: Click on the “Create Form” green button located at the middle of the page.

Step 3: Select the middle option “Use Template”.

Step 4: On left side of page, under types click on “Contact Forms”.

Step 5: Select “General Enquiry Contact Form” by clicking on “Use Template” below it.

NOTE: Use any other “Contact form” templates which best fits your needs and liking, we will be using “General Enquiry Contact Form” for simplicity purpose.
Step 6: Click on the “Add Form Element”.

In this section, you can more fields, extra texts. For example, I have added a phone number field for our extra requirements.

Step 7: Use “From Designer” tab on the right side of the page to change the appearance!

Use colour scheme to change the overall colour of the contact page.

Step 8: Jotforms also provides with an option to brand your website on the Contact form.
To add logo of your website to Contact Us page, click on “ADD YOUR LOGO” which is located above contact us page.
Click on the upload file field or drag-drop HD image of your logo.
Adjust the alignment and it’s done!
Step 9: Click on setting tab.
Here you can set logical conditions of the form(effects like show hide fields),
Notifications to be sent via email to you,
Integrate your contact form with MailChimp services and
one can set auto-mail-responder response message who has contacted you using Contact form.

Step 10: Click on the “Publish” tab.
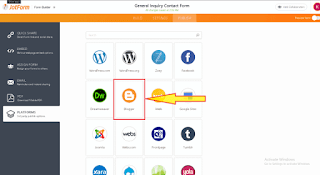
Under the “Publish” tab click on “PLATFORMS” located on left side.

Select blogger platform from list.

On the next page, the code to embed will be displayed.
Click on the green colour “Copy code” button (code will be copied to your clipboard).
 embed Codes")
Step 11: Now, its time to add our Contact form to blogger.
- Open blogger dashboard, Navigate to “Pages” page,

- Click on the “New Page”,
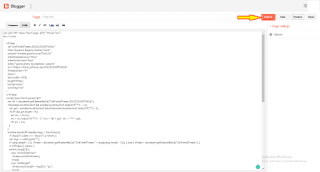
- Change the view to HTML view by clicking on the ”HTML” button,

- Paste the copied code in the HTML editor.
To publish your Contact Form click on the orange button “Publish”.

Conclusion :
Adding a contact page is very important in getting approvals for various affiliates.Now you can make your blog more professional looking by adding “contact us” page.
You can now apply to various affiliate programs and ads network like Adsense with better confidence and start earning.


)
11 Comments
Thank you for your help. I really enjoy what you've written here and wish you well with your blog!
ReplyDeletemoney saving expert iva
Awesome👍👍👍👍
ReplyDeleteVery significant article for us ,I think the representation of this article is actually superb one. This is my first visit to your site.step change reviews
ReplyDeleteReally appreciate this post. It’s hard to sort the good from the bad sometimes, but I think you’ve nailed it!
ReplyDeleteHP Laptop Screen Replacement
Sir firstly I want to thank you for this post and knowledge 😊 and secondly I want to say friends if you want to know making and proffesional contract from that user sumbit froms came in your Gmail section and you can coprate with them can you can also use this way for better expirence
ReplyDeletehttps://www.hacktheitem.xyz/2022/01/how-to-create-contract-us-form-on.html?m=1
If you want to add a contact form to your blog I would highly recommend you use
ReplyDeletehttps://fabform.io
laptop repair service center in dubai
ReplyDeleteOnce again, I appreciate all the wisdom you share. nice post The article piqued my curiosity greatly, and I must say that it is incredibly motivating. I enjoy visiting your website since I frequently find engaging posts like this one. Excellent work; I sincerely appreciate that. Continue to share! Regards Laptop Data Recovery in Dubai
ReplyDeleteProfessionals in the disciplines of career counseling, job coaching, life coaching, and business consulting developed the Profile Creation List. The purpose of the Comment is to assist individuals in developing their own distinctive professional profile that accurately captures their particular interests and beliefs. Profile Creation List
ReplyDeleteQuality backlinks for better growth in SEO We all know how crucial backlinks are to a website. They are what make a website rank higher in search engine results in pages. For example, if you were looking for a local restaurant, and you typed in "best restaurants in Seattle," the first search result would be a website with a lot of backlinks. But what happens if you want to make your website rank higher? Quality backlinks are the answer. look at my January work 2023 for a better understanding of quality backlinks on the given link.
ReplyDeleteVisit_here: All Backlink List
Very informative article! The quality of your content is truly impressive. At Mohindra Mechanical Works, we manufacture Automatic Sheet Cutting Machines, High Speed Sheet Cutting Machines, Embossing Machines, Paper Embossing Machines, Foil Embossing Machines, and Film Embossing Machines. Keep posting such informative blogs.
ReplyDelete