
In my previous tutorial I explained robots.txt and how to get one but today I'll give you a complete guide on how to enable your custom robots header tags in blogger.
As we all know that Traffic is a life of any blog, to increase blog traffic the owner of the blog must have to work on SEO. Now it not enough that you know how to blog? we have to start work on search engine optimization basic applications, so why are you waiting for just update your settings and start boost your blogger blog traffic, and improve your search ranking.
Now you can see the Custom Robots Header Tags option on the Blogger dashboard to improve search engine optimization (SEO) for search engines like Google, Bing, Yahoo, Yandex, and others.
Check out:
• How to add a custom robots.txt file in Blogger
• Create Blogger Sitemap and Add to Google Webmaster Tools
• How To Create HTML Sitemap Page In Blogger
1. all:
This robot header tag feature will allow search engine crawler visit and discover every single element of your blog. Therefore, if you check and enable this feature, you will give the complete freedom to the crawler to crawl and index everything.
2. noindex:
This feature is given for private blogs. If someone thinks not to share his blog publicly, this option is for them. Usually, allowing this option will prevent search engine crawler from crawling and indexing the blog. So nobody will be able to discover that b via search engines.
3. nofollow:
You may have heard the term nofollow and dofollow before. This is a critical, complex, and confusing SEO factor because improper use of these tags may increase or decrease search engine ranks of your blog. Blogger provides this feature to let you make all of the outbound links of your blog nofollow if you wish.
4. none:
If you wish to apply both noindex and nofollow tags together, you can enable this feature. It will prevent search engine crawlers from indexing and be considering outbound links dofollow.
5. noarchive:
This feature is given to control the search engine cache permission. Usually, search engines collect a cache version of your web page and show it on the search engine result page (SERP). Actually, the cache is a frequently updated copy of your web pages is used to serve your website on the downtime by search engines.
6. nosnippet:
Almost every search result includes a small snippet on the SERPs. It helps people to get an idea about the content of the web page. However, enabling this feature will prevent search engines to show that text snippet.
7. noodp:
ODP stands for “Open Directory Project” like Dmoz. Actually, you can prevent adding your website information there by enabling this feature.
8. notranslate:
This option will allow you to disable translation of your blog in different languages. Although machine translation is not hundred percent readable, we should let our readers translate the web page if they want.
9. noimageindex:
Allowing this option will prevent search engines to index images of your blog. In my opinion, it is wise to use this feature with caution. Because images are a major part of blogging and can increase the organic traffic of your blog.
10. unavailable_after:
If you wish to deindex your blog after a specific amount of time, you may check this option.
First of all, login to your Blogger account and go to the dashboard. If you have more than one blog in your blogger account, select the one you need to enable custom robots header tags.
Step 2:
From the left menu, Click on the Settings >> Search Preferences. Now take a look on the right side. You will see the “Custom robots header tags” option right after the Custom robots.txt. Here you have to click on the Edit.
Step 3:
At this point, you have to enable this feature by clicking on the first radio button yes.
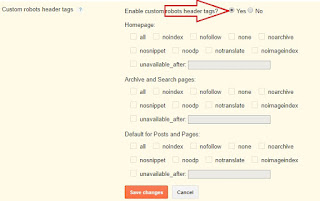
Step 4:
Now, you will get a set of checkboxes. But don’t get intimidated! It may feel like a complicated one, but it’s not. Just follow the same settings I chose and hit Save changes. See the infographic below for more information.

Congratulations! You have done it. Trust me custom robots header tags are powerful! As Google provides a readymade setup to use them, why don’t you go for it? And, don’t tick noindex checkbox until and unless you are sure about it because doing the same will pull your website off from search engine result pages (SERPs).
Warning: If you do not know what you are doing and what the result will be, then don’t play with custom robots header tags because it may remove your blog from search engines. Don’t press the Save button if not making any of the changes.
You can customize robots header tags for your blog as you prefer. Now your blog is ready to get more organic traffic.
I hope the above method helps you to Settings the robots header tags into a blogger blog. And if you have any problem or know more of Custom Robots Header Tags Settings For Blogger, Please share with us in the comments section below.
As we all know that Traffic is a life of any blog, to increase blog traffic the owner of the blog must have to work on SEO. Now it not enough that you know how to blog? we have to start work on search engine optimization basic applications, so why are you waiting for just update your settings and start boost your blogger blog traffic, and improve your search ranking.
Now you can see the Custom Robots Header Tags option on the Blogger dashboard to improve search engine optimization (SEO) for search engines like Google, Bing, Yahoo, Yandex, and others.
Check out:
• How to add a custom robots.txt file in Blogger
• Create Blogger Sitemap and Add to Google Webmaster Tools
• How To Create HTML Sitemap Page In Blogger
What are Custom Robots Header Tags in Blogger?
Inside Blogger settings under custom robots header tags, you will have the following options that I will describe here.1. all:
This robot header tag feature will allow search engine crawler visit and discover every single element of your blog. Therefore, if you check and enable this feature, you will give the complete freedom to the crawler to crawl and index everything.
2. noindex:
This feature is given for private blogs. If someone thinks not to share his blog publicly, this option is for them. Usually, allowing this option will prevent search engine crawler from crawling and indexing the blog. So nobody will be able to discover that b via search engines.
3. nofollow:
You may have heard the term nofollow and dofollow before. This is a critical, complex, and confusing SEO factor because improper use of these tags may increase or decrease search engine ranks of your blog. Blogger provides this feature to let you make all of the outbound links of your blog nofollow if you wish.
4. none:
If you wish to apply both noindex and nofollow tags together, you can enable this feature. It will prevent search engine crawlers from indexing and be considering outbound links dofollow.
5. noarchive:
This feature is given to control the search engine cache permission. Usually, search engines collect a cache version of your web page and show it on the search engine result page (SERP). Actually, the cache is a frequently updated copy of your web pages is used to serve your website on the downtime by search engines.
6. nosnippet:
Almost every search result includes a small snippet on the SERPs. It helps people to get an idea about the content of the web page. However, enabling this feature will prevent search engines to show that text snippet.
7. noodp:
ODP stands for “Open Directory Project” like Dmoz. Actually, you can prevent adding your website information there by enabling this feature.
8. notranslate:
This option will allow you to disable translation of your blog in different languages. Although machine translation is not hundred percent readable, we should let our readers translate the web page if they want.
9. noimageindex:
Allowing this option will prevent search engines to index images of your blog. In my opinion, it is wise to use this feature with caution. Because images are a major part of blogging and can increase the organic traffic of your blog.
10. unavailable_after:
If you wish to deindex your blog after a specific amount of time, you may check this option.
How to Set up Custom Robots Header Tags on Blogger?
Step 1:First of all, login to your Blogger account and go to the dashboard. If you have more than one blog in your blogger account, select the one you need to enable custom robots header tags.
Step 2:
From the left menu, Click on the Settings >> Search Preferences. Now take a look on the right side. You will see the “Custom robots header tags” option right after the Custom robots.txt. Here you have to click on the Edit.
Step 3:
At this point, you have to enable this feature by clicking on the first radio button yes.

Step 4:
Now, you will get a set of checkboxes. But don’t get intimidated! It may feel like a complicated one, but it’s not. Just follow the same settings I chose and hit Save changes. See the infographic below for more information.

Congratulations! You have done it. Trust me custom robots header tags are powerful! As Google provides a readymade setup to use them, why don’t you go for it? And, don’t tick noindex checkbox until and unless you are sure about it because doing the same will pull your website off from search engine result pages (SERPs).
Warning: If you do not know what you are doing and what the result will be, then don’t play with custom robots header tags because it may remove your blog from search engines. Don’t press the Save button if not making any of the changes.
Edit Custom Robots Tags on Posts and Pages
Once you enable that Robots Header Tags in your Blogger, you can see the "Custom Robots Tags" is available for you in each post. That will be available on the right side of your post page Under Post settings >> Custom Robots Tags. You can use default settings or customize the settings as you wish.You can customize robots header tags for your blog as you prefer. Now your blog is ready to get more organic traffic.
I hope the above method helps you to Settings the robots header tags into a blogger blog. And if you have any problem or know more of Custom Robots Header Tags Settings For Blogger, Please share with us in the comments section below.
0 Comments